Renovating My Own Home – Part 2: Planning + Design

PLANNING & DESIGN
This is the story of how my partner and I are transforming a simple cottage into a considered, functional home — our own renovation project. As an interior designer, I’m approaching it with the same MARG. Studio process I use with every client, from purchase through planning, design, and the upcoming custom home build. For my partner, this is a completely new experience, and for both of us, it’s a chance to create a home we hope to live in for decades.
If the purchase stage brought a few surprises — including the early budget shock, which was at least 50% higher than we had anticipated — it was the planning and design phase where the renovation truly began to take shape, long before any construction started on site. My overall intention was simple: to treat our own home exactly as I would a full-service interior design client project. The same process, the same detail, and the same respect for early decisions and planning. For more about the house purchase and early budget considerations, see our post on purchasing a fixer-upper.
This phase involved working through council planning requirements, design development, and interior budgeting. Each informed the other, ensuring we reached the level of resolution we wanted before construction commenced. The purpose of this level of detail upfront was to give us the most flexibility during the build, so we could avoid — touch wood — unexpected budget shocks or being forced to downgrade products along the way.
The Design & Vision
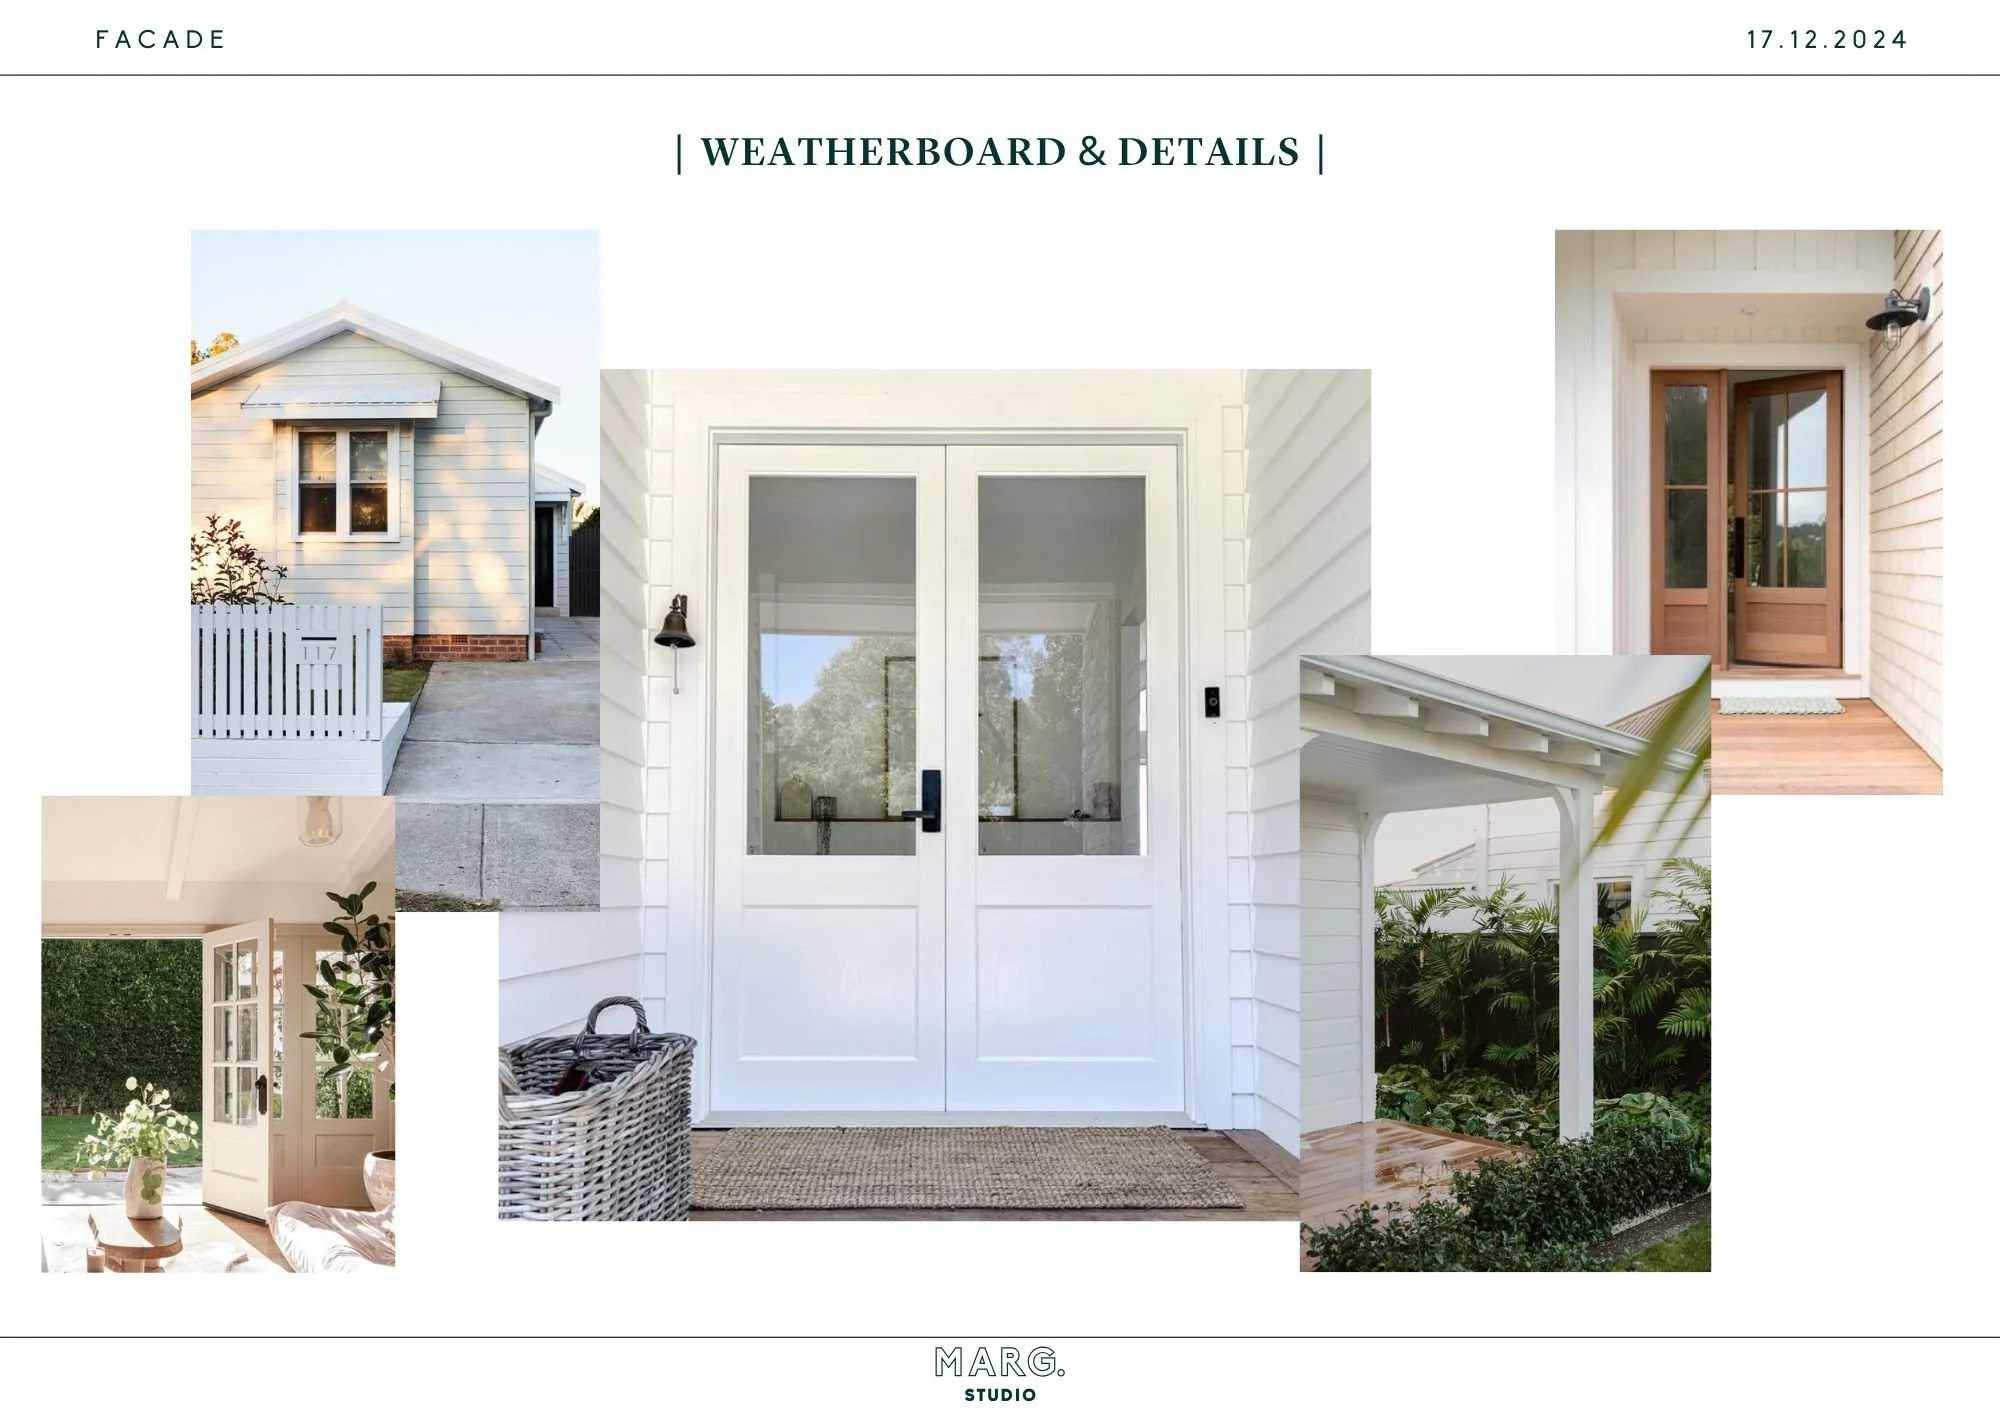
Having already spent time during the purchase process considering the floor plan, we had a clear direction for the layout and function of the home. Essentially, we were taking a 3-bedroom, 1-bathroom L-shaped cottage and filling in the L to create a rectangle shaped home — rationalising the roofline and adding a central entry hallway. The new extension would include a bedroom/living space and main bathroom. Essentially we completed a Floor Plan Review on our design before we even started which I think sets the right foundations for the design work that follows.
With the layout largely established, we began the Concept Design Phase. We sat down as “clients” and discussed what we liked and didn’t like, how we wanted each room to function, and — most importantly — how we wanted the home to feel: comfortable, functional, long-lasting, and entirely reflective of us. Spaces needed to support daily life and be interesting without feeling overly precious.
From there, I created full concept mood boards for the house. They’re still pinned up in the studio and I refer back to them constantly as I finalise interior selections. Having that visual north star has been invaluable — a reminder of the original intent when individual decisions start to feel overwhelming.
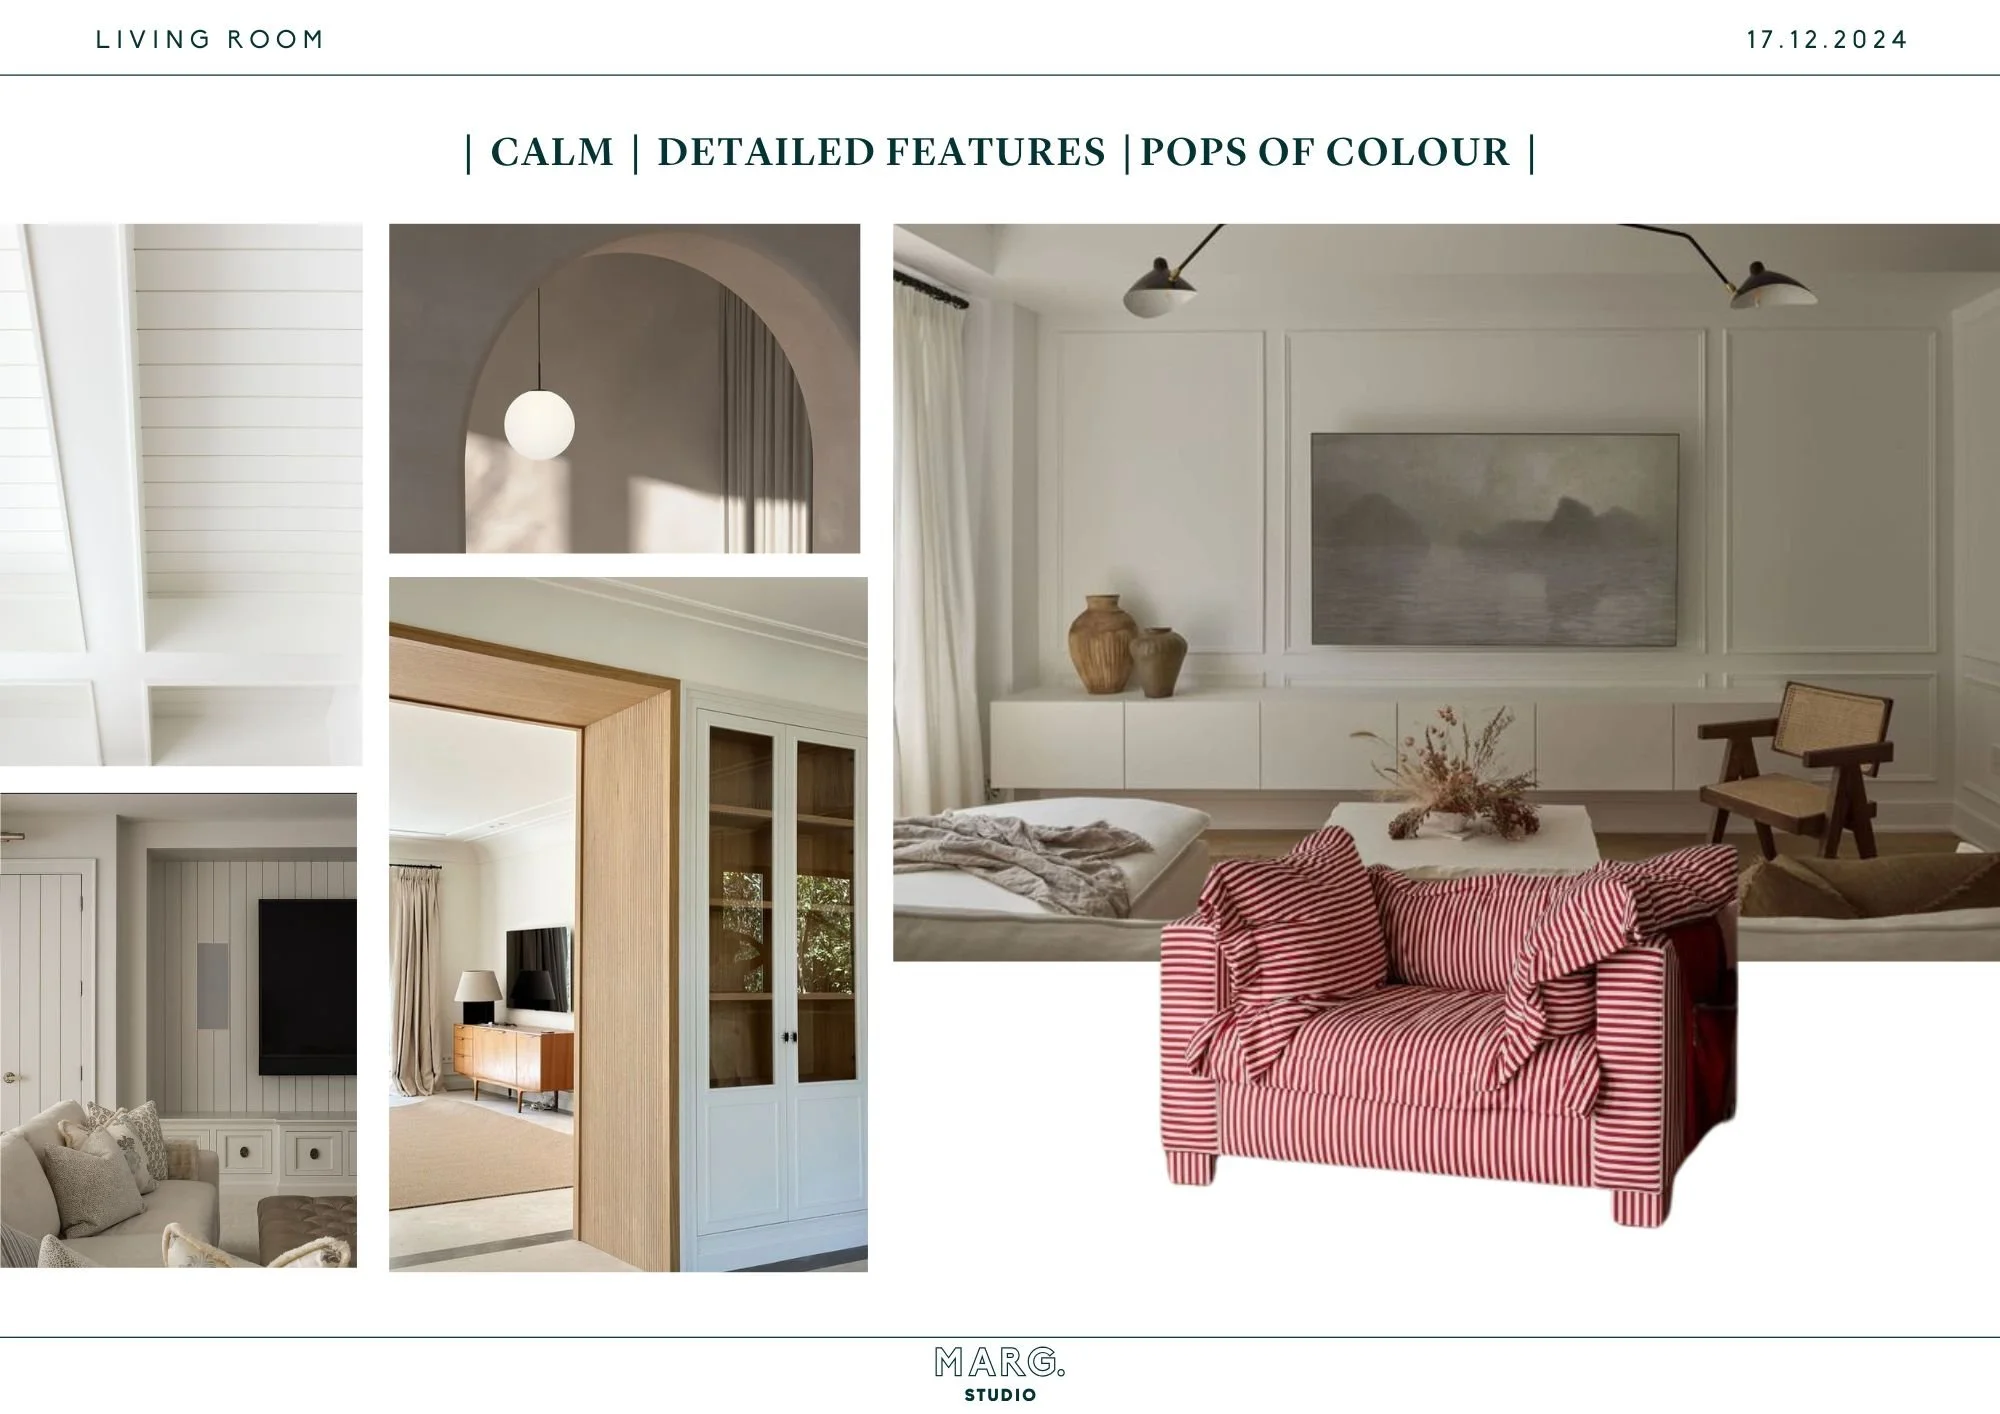
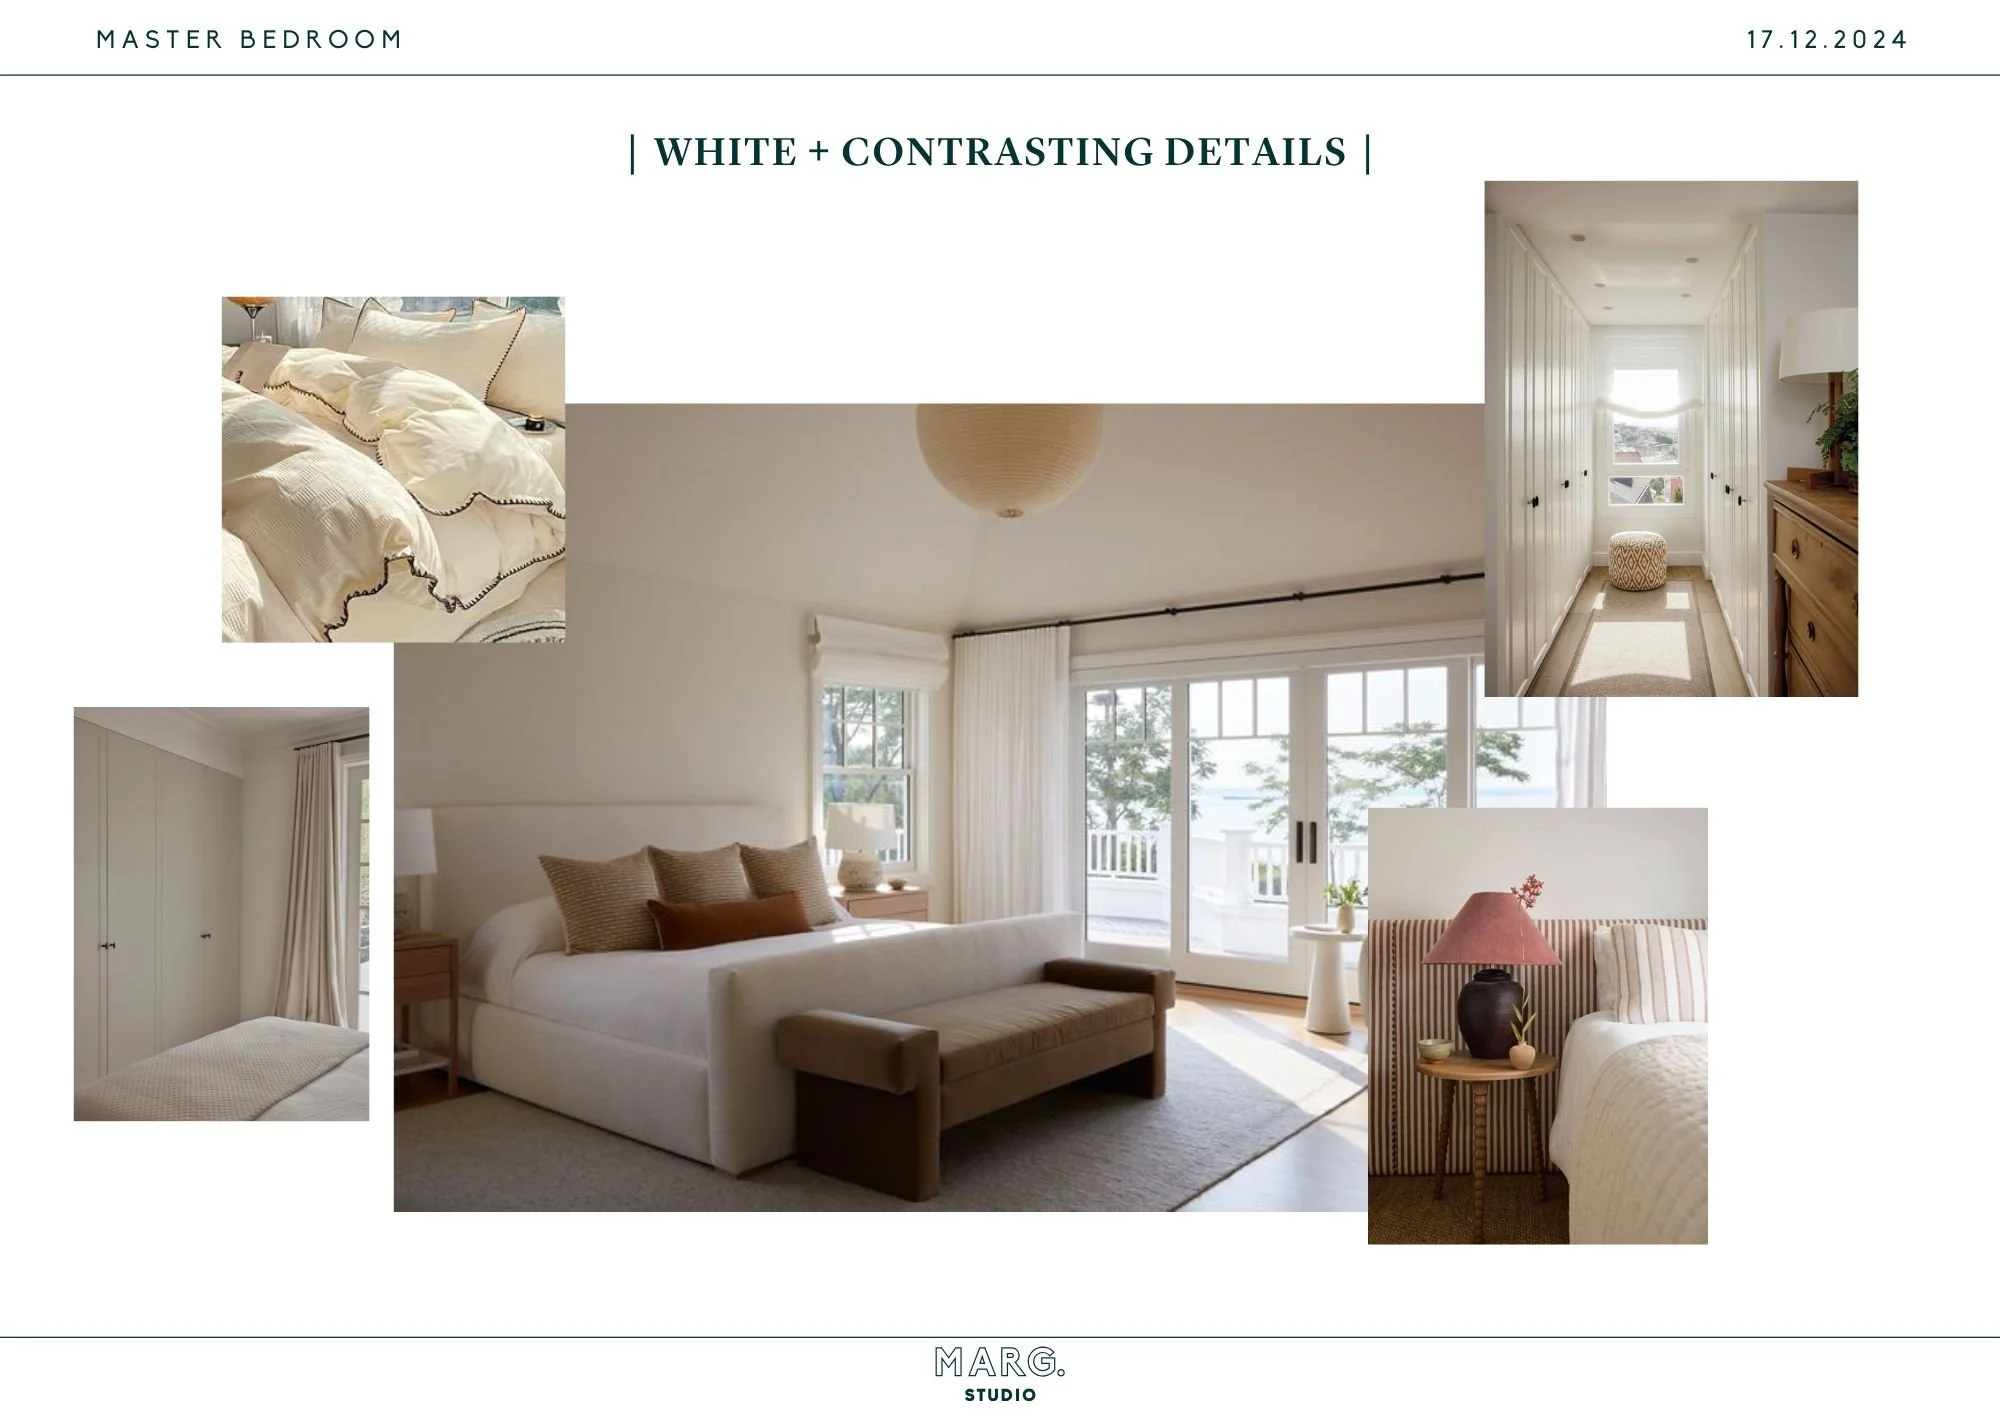
Design for our home has been evolving since the day our offer was accepted, with my brain and Pinterest board overflowing with ideas. Concepts bubbled away quietly in the background, gradually refining and resolving themselves over time. Some decisions landed almost immediately, like the archway between the living and dining rooms, while others, such as the bathroom tile layout, came right down to the wire. Allowing ideas to settle naturally rather than forcing them early has been a luxury that’s reinforced the value of patience in interior design.
One of the most challenging parts of the design process, I’d say, is the period between initial concepts and detailed product selections. In Concept Design, everything is new and exciting — you are free to imagine and explore whatever wild idea fits the brief. By the time you reach Design Development, selecting materials and finalising layouts becomes more logical: it’s mostly research and planning. Sometimes it’s no less frustrating, but often it’s more straightforward.
Bridging that gap between initial ideas and final selections is where I find I have to ride the wave of creativity. Some days it doesn’t flow at all, and it needs to sit in the background of your mind before everything suddenly falls into place once the timing and thoughts are right.
So, having let the ideas develop and present themselves, our Concept was set and we moved into Design Development. We began drafting the Technical Drawing Package to resolve spaces with specific measurements and layouts, and my team translated key ideas into 3D renders. Seeing the home come together visually and technically became the bridge between imagination and reality.
The Technical Drawing Package begins early and only truly finishes once every product, fitting, layout, and junction is resolved. This reinforced something I believe strongly: the more resolved the design is before builders arrive on site, the smoother the build becomes. What may feel like finicky planning now prevents costly changes, double handling, and frustration later. A misplaced light switch that prevents hanging artwork or a door swing that impacts furniture placement are perfect examples of issues this stage addresses.
The Full Budget
While the vision was taking shape, the budget ran quietly alongside it. Dreaming is essential, but it must stay grounded in reality. We had already prepared an initial Budget Forecast during the house purchase phase, so this stage focused on refining the budget and working toward a fixed-price building contract with our chosen builder.
I prepared a detailed Budget Forecast for interior items covering joinery, finishes, fixtures, and fittings, and began conversations with a couple of builders to understand ballpark construction costs based on our level of specification. I certainly feel like I have a much better understanding of what this process feels like for my clients. Balancing financing, decision-making, and daily life simultaneously is no small task, particularly for a renovation that may only happen once or twice in a lifetime.
My aim with these interior design Budget Forecasts is always to set expectations clearly from the start. I prefer to establish a realistic view of the level of specification so there are no surprises later. Without this document, a builder would need to make assumptions about tiles, taps, or finishes to provide their quote. It’s far easier to start from a considered specification and adjust down if necessary than to begin with bare minimums and try to lift the budget later — which can compromise quality, functionality, and the overall design vision.
Planning: The Slow Part No One Sees
The planning phase is something I’ve always understood professionally, yet experiencing it firsthand was completely different. In full-service interior projects, I guide clients to the right consultants, though I’m not usually privy to every conversation and submission for council approvals.
Working through council, consultants, approvals, and timelines revealed just how layered and time-consuming the process can be. We had already let go of any idea of being “in by Christmas 2025” by the time we reached this stage, which helped.
Timeline
January 2025 - Budgeting, vision development and planning approvals begin in parallel to one another.
Early March 2025 - Formally engage draftsman to commence Development Application package.
Mid March 2025 - Met with engineer on site with draftsman to coordinate the engineering requirement for DA.
Late May 2025 - Draft DA package issued from draftsman for us to review.
Late June 2025 - DA lodged
Mid July 2025 - Tenants signed on for another 6 month lease.
Early August 2025 - DA approved.
Early September 2025 - site meeting with builder and trades to review Scope of Works
Late September 2025 - Meeting with builder to review Fixed Fee Quote together.
Late October 2025 - Signed building contract with Kurrajong Projects
Mid November 2025 - Construction Certificate Lodged + commenced purchasing client supplied items (stored off site)
Early December 2025 - Construction Certificate issued
Late December 2025 - Interior Technical Drawings and Schedule Package finalised and issues to builder and trades
January 2026 - Tenants move out + build scheduled to commence
Once our draftsman confirmed a Development Application (DA) was required, they guided us through everything needed — from the initial site survey to consent documents authorising them to lodge on our behalf. While we could have submitted everything ourselves, it was worth every cent to engage someone experienced in navigating the council system, freeing me up to focus on the design.
One notable design change during this time was extending the new bedroom to align with the front verandah, creating an asymmetric façade rather than retaining symmetry. It increased the room size significantly for proportionately little cost, and our draftsman confirmed council were unlikely to object.
DA approvals were expected to take 6–8 weeks at the time in Orange, so we were pleased when ours came back with minimal conditions within that timeframe. The next step was locking in a builder, as some elements required their details for certification, including plumbing submissions for the Construction Certificate.
Selecting Our Builder
Through previous projects and early conversations, I had a shortlist of builders to approach. Price was important, but availability, enthusiasm for the project, and the detail in quotes were equally key.
To receive accurate pricing, we issued our Draft Technical Drawing Package with the Budget Forecast. Details such as tile quantities, material type, and laying pattern affect cost, so having these defined early allowed meaningful comparison.
All the quotes came back within a similar range, helping confirm our project budget was realistic.
Ultimately, Archie and the team at Kurrajong Projects were the right fit. Their experience with older homes, attention to detail, and enthusiasm — along with availability in late 2025/early 2026 — made the decision straightforward.
We then worked together to refine the quote to a fixed-price building contract, giving confidence in the final figure while recognising the upfront detail required for accuracy — something I emphasise with my clients in full-service interior design projects. It’s good to note that every project is different, so a fixed-price contract may not suit every build or builder.
Selecting & Purchasing

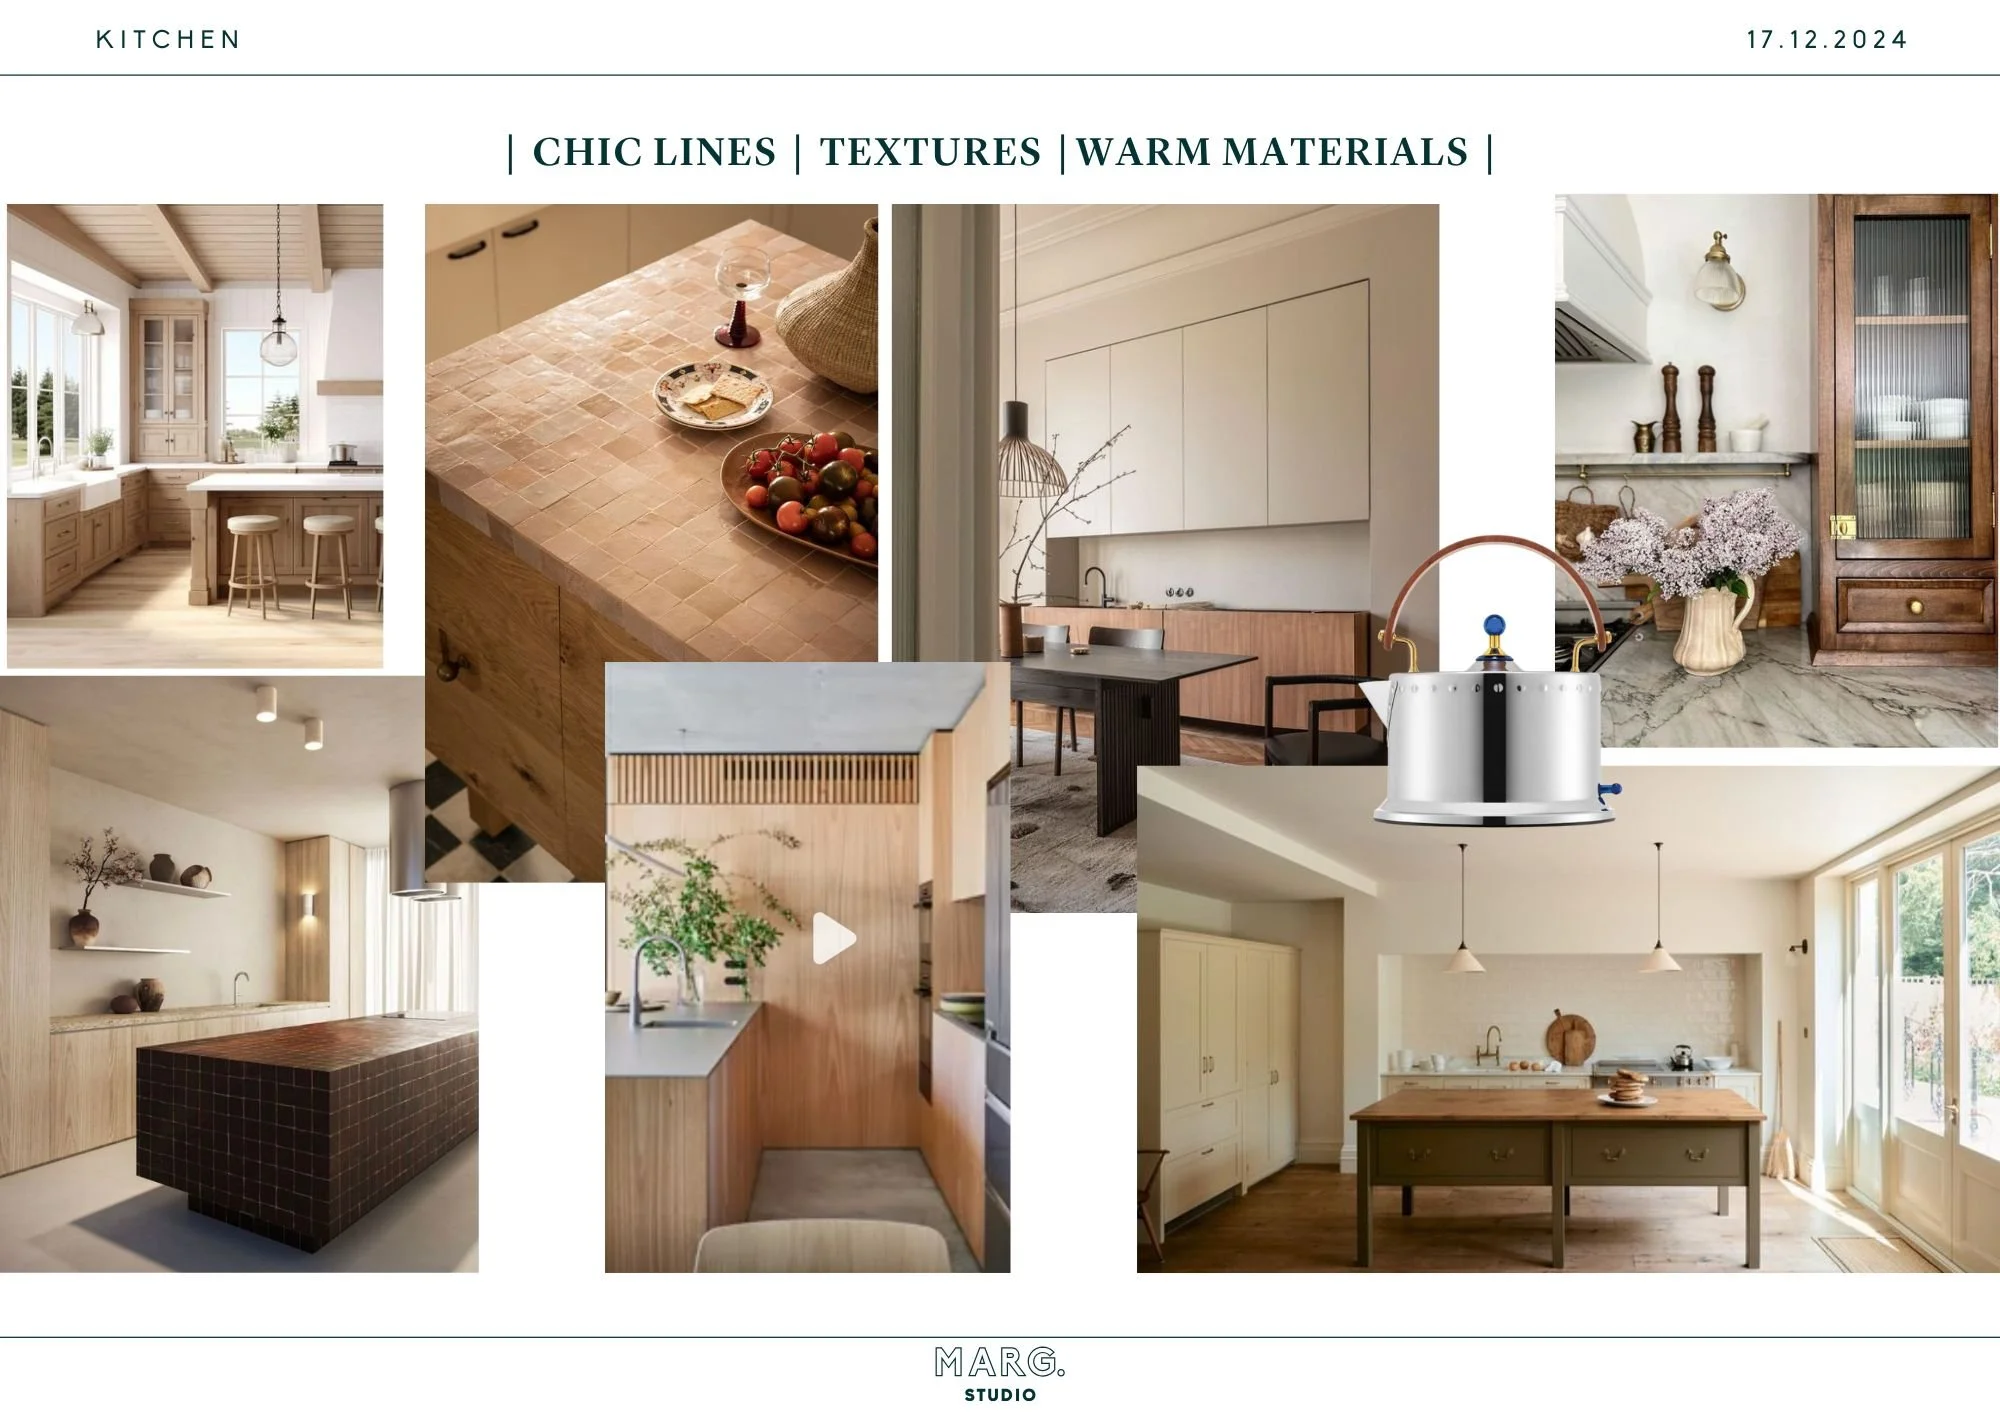
Assembling material samples as all the selections began to fall into place.
Establishing a strong concept is one thing; sourcing products that align with the design vision and budget is another. I worked with trusted suppliers and discovered new ones that complemented the home. While I do much of this from my studio in Orange, some items — such as baths or large-format tiles — needed to be seen in person, requiring a few trips to Sydney.
As with full-service projects, our team set up Product Schedules for lighting, hard materials, tapware, joinery, doors, windows, and paint. These schedules act as both a shopping list and a communication tool for trades, procurement, and installation. They also allow easy tracking of purchase and deliveries.
We had detailed conversations with Kurrajong Projects to clarify responsibilities, ensuring nothing was double-counted and items would be purchased and on site when needed. I often purchased directly due to existing supplier relationships and to maintain control over custom design details, especially for things like custom timber external doors. In client projects, the purchase of products is something that is discussed with the builder to ensure we have the best approach for the project.

3D renders have been created and refined as we started to make layout and design decisions.
Looking Ahead
With the vision defined, budget refined, approvals in place, the building contract signed, and every material selected, we’re ready to move into the build phase!
The next chapter will be shared in real time as construction begins in January 2026 — the messy, exciting, nerve-wracking stage where all of this careful planning and interior design work finally becomes tangible. I can’t wait!